
Sunday, November 28, 2010
New blog
I'm switching over to a new blog name! I think that the name sounds better, even though it is not witty in the least. Oh well! In Krista's Kitchen
Saturday, November 27, 2010
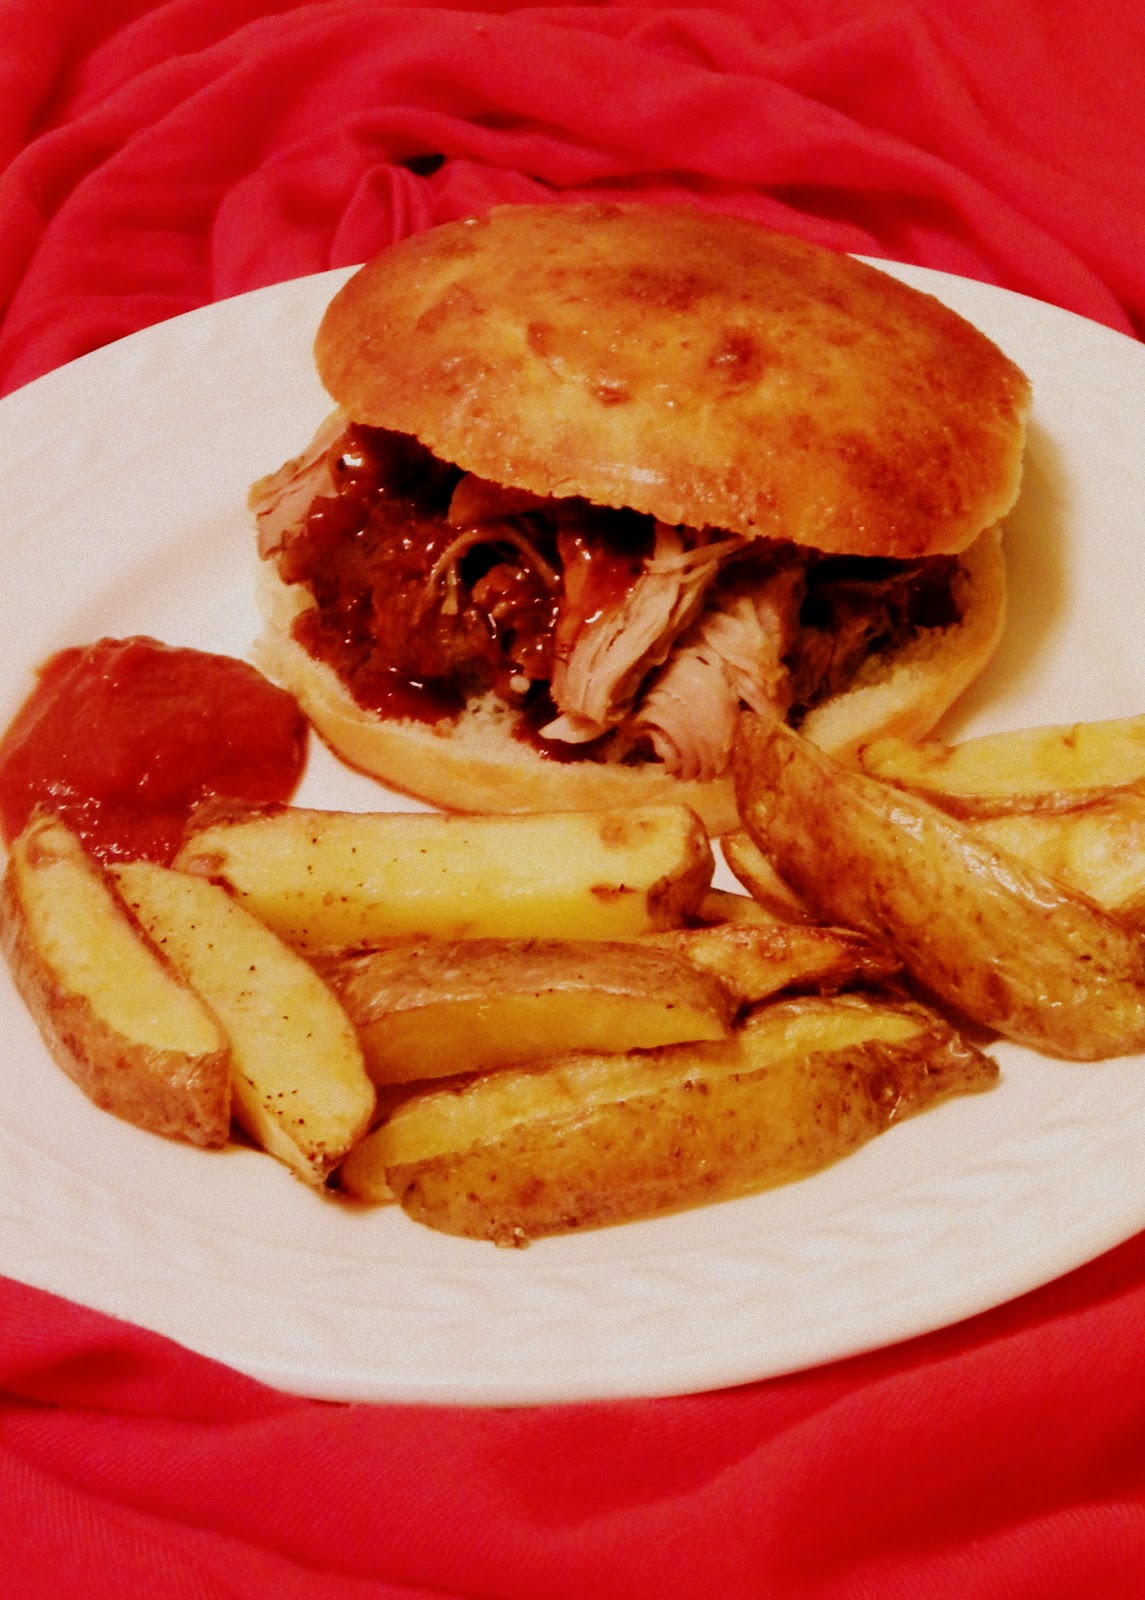
Pork Sandwiches
Or as my friend Sarah would call them, "BBQ sandwiches". Many fights have been fought over what constitutes as BBQ, but I'm pretty sure that you need to be more specific when you say "we're eating BBQ". Anyway, this meal was pretty easy. I managed to prep everything and throw it in the slow cooker in about 30 minutes, and that counts the two times that I ran to the store across the street to get something. I put Alex in charge of making the buns (since I had to go to work and couldn't clone myself quickly enough to bake a batch), and even though he was a little apprehensive about being in charge of something beyond stir-fry, the buns turned out great. I ate a whole bun by itself before dinner. And the meat smelled so amazingly-awesome that I started forking off pieces and dunking them in BBQ sauce while I waited for my fries to hurry up.
This recipe is from Life's Ambrosia
Ingredients
Combine all of the spices and rub the pork down.
Let the pork rest a bit- preferably overnight.
Chop up the onion and lay it on the bottom of the slow cooker.
Place the meat on top of the onions and fill the slow cooker with the beef broth and water.
Cook on low for 8 hours.
Scoop the meat up with a slotted spoon and encourage the meat to fall apart by pulling at it with two forks. This step should be a breeze.
 Eat the meat in a sandwich, burrito, fajita, enchilada, whatever works.
This recipe is from Life's Ambrosia
Ingredients
- 3 lbs of pork shoulder
- 1 teaspoon chili powder
- 1 teaspoon cumin
- 1 teaspoon granulated garlic
- 1/2 teaspoon fresh cracked black pepper
- 1/2 teaspoon dried oregano
- 1 (5 pound) bone-in pork shoulder
- 1 medium onion
- 3 cups beef broth
- 2 cups water
Combine all of the spices and rub the pork down.
Let the pork rest a bit- preferably overnight.
Chop up the onion and lay it on the bottom of the slow cooker.
Place the meat on top of the onions and fill the slow cooker with the beef broth and water.
Cook on low for 8 hours.
Scoop the meat up with a slotted spoon and encourage the meat to fall apart by pulling at it with two forks. This step should be a breeze.

Belated Pumpkin Pie
So... I had A LOT of pumpkin puree left over from my cornbread, and I promised Alex that I would make him a pie with it. I almost changed my mind about making this pie after Alex ate FIVE slices of pie yesterday, but I wanted to make some for myself. I chose to make this particular recipe because 1) it doesn't require making a legit pie crust and 2) the filling is "paleo" friendly (which means that it contains stuff that only paleolithic people ate- Alex is a fan of this approach to eating). Wherever a paleo woman ever managed to scrounge up honey, pumpkin pie spice, coconuts, salt, and vanilla extract is beyond me. Anyway, I wanted to continue to Thanksgiving theme by making this tonight. I also wanted to use the arrowroot starch that I bought weeks ago, and can't find any recipes with starch in them that I really want to make with it. Oh, and hear is a list of all of the things that I am thankful for, starting with the most obvious.
- my hunk of a man
- my mom- who is my best friend. No joke.
- all of the other members of my families
- my obese cats
- my horses and all that they have made me become
- the fact that I got into such a great school with a pretty awesome Chinese dept.
- the fact that my mom gained some weight and had to give me her brand-new super coat (thanks mom!)
- the fact that I picked up a love of cooking/baking
- China- for being so bizarre and quirky
- the fact that I am no longer such a picky eater
- my kitchenaid mixer
- the fact that I finally started a work out that gets me off of the elliptical
- Netflix- best subscription service ever
Crust
- 2 cups ginger snap- I made my own using my recipe below (they may or may not have been fudged, but it doesn't matter since why would you make the pedestal better than the item on display?)
- ¼ cup olive oil
- ¼ cup maple syrup
- 1 ½ cups of pumpkin puree
- 3 eggs
- 1 cup coconut milk
- ½ cup honey
- 1 tablespoon arrowroot starch
- 1 teaspoon vanilla
- 1 tablespoon pumpkin pie spice (I used a recipe here to make my own, since I have all of the ingredients and PP spice is pretty expensive for something that you only use during one season and then it goes bad)
- 1 teaspoon salt
Crust
Crush up the gingersnap cookies and combine with the maple syrup and olive oil. Press into the bottom of a 9x9 pie plate (2 cups of cookies gave me enough crust to fill in the bottom of the plate, but not the sides). If you are having problems mooshing the crust into the plate, let the crumbs soak a little bit longer in the olive oil and maple syrup.
Filling
Combine all of the ingredients for the filling in a pretty large bowl and STIR WELL. I would have used my stand mixer to do this, but it was dirty. I probably would have saved a bit of time if I had, since I had issues with my arrowroot starch clumping up.
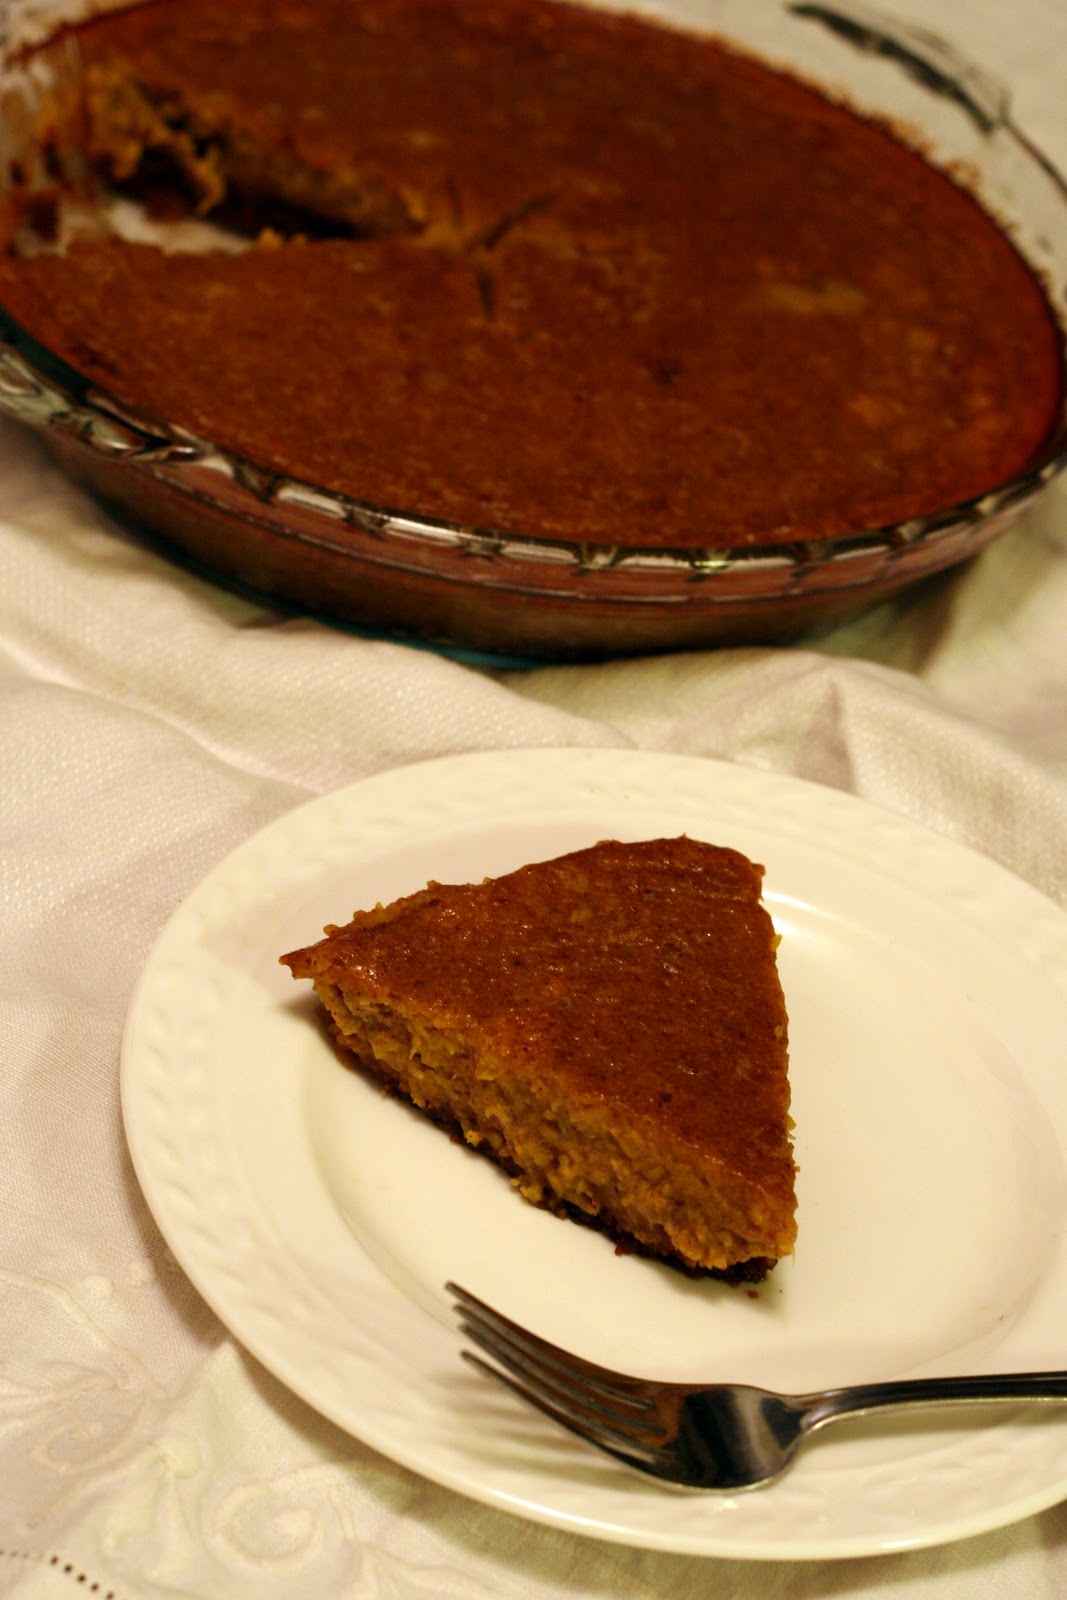
Pour the filling into the crust. Bake for about 50 minutes in an oven that has been preheated to 350 degrees. Cool in the fridge (I found it best after a night in the fridge) and eat with a mound of whipped cream.
I was pretty surprised by this recipe (mainly because it came out actually looking like pumpkin pie). I was kind of indifferent to the pie after an hour in the fridge, but this morning I couldn't stop myself from going back for a second piece of breakfast pie.

Wednesday, November 24, 2010
Pumpkin Puree
My contribution to the Thanksgiving family feast tomorrow is my pumpkin cornbread. A few weeks ago I noticed that none of the grocery stores that I shop at had any pie pumpkins out. I was horrified! It was as if all of the pie pumpkins had been bought up by Libby's and processed so that the 2010 pumpkin shortage wouldn't reoccur. I prematurely decided that I was defeated, and picked up a can of pumpkin. However, last night I had a hankering for some Neapolitan pizza and didn't have any tomatoes. I chose to shop at a store that I always forget exists, mainly because they specialize in cheese. As I walked up to the storefront (I had walked all the way there, assuming that it wouldn't take as long as it did...), I noticed that there was a HUGE CRATE FULL OF PIE PUMPKINS. I almost died. I also almost bought 5 so that I could make a ton of puree and freeze it, but then I realized that there was no way that I was going to carry 5 pumpkins + other purchases home in the cold. So... this Thanksgiving I am thankful that I was able to purchase a legit pumpkin, and not have to feed my family Libbys.'s. I mean, if I was busy actually doing homework or making more than just my pumpkin cornbread I would probably use canned pumpkin, but I like avoiding doing my term paper way too much to not spend time actually cutting up/gutting/baking/scooping out pumpkin.
Ingredients:
Pie pumpkin!

Procedure:
Preheat oven to 350 degrees.
Cut off the stem and slice the pumpkin in half.

Place pumpkin halves face-down on a cookie sheet covered with tin foil.
Cover the pumpkin halves with tin foil (this helps with evenly cooking the pumpkin since there is a huge gaping hole where the stem used to be (at least the way I cut the pumpkin since I'm too weak to cut off the stem in one go)).
Bake for an hour and a half.
Let the pumpkin cool and then scoop out the seeds. This step can be done before the pumpkin is baked, but I find it easier to remove the seeds and guts post-baking. Save the seeds if you like them, but I just throw them away. Scoop out the pumpkin flesh and mash it to smithereens or use a mixer. My pumpkin remains stringy because I don't have any fancy equipment to completely puree it, but I kind of like the added texture in my cornbread. I'm sure once I get a food processor or food mill I will change my mind, but that has to wait until I go home for Christmas I nab my mom's.

Tuesday, November 23, 2010
Gingersnap Cookies

Since Alex and I are moving to China at the end of this summer, I'm really making an effort to use up my spices. It doesn't help that the recipes that I'm using to use up all of these spices call for other spices, so I just end up buying more spices anyway! Tonight I was able to make these cookies without having to buy any extra spices, so I was pretty ecstatic about that. No lie. However, I didn't have any ground cloves. I went all mega-domestic and ground my own. This was accomplished by mashing whole cloves with a teaspoon, then rolling the cloves with a rolling pin, and then repeating the mashing with the teaspoon. I NEED a mortar and pestle. I need a lot of things that I don't have space for though =/. Anyway, cookies aren't usually on my list of things to make. Ever. I don't think that I have baked any sweets since I was scarred in high school. I spent hours and hours baking and decorating a cake for some guy, and he had the gall to tell me that it was dry. However, these cookies really spoke to me (mainly because I have a lot of molasses).
Ingredients
- 3/4 cup unbleached all purpose flour
- 1/4 cup whole wheat pastry flour
- 1/4 cup brown sugar
- 1/2 tsp ground cloves
- 1/2 tsp ground cinnamon
- 1 tsp baking soda
- pinch of salt
- 1/2 cup molasses
- 1/4 cup canola oil
- 1/2 tsp vanilla extract
- 1 egg
Combine dry ingredients in mixer bowl.
Combine the wet ingredients in a separate bowl.
Combine them both and mix in a mix stand with the paddle attachment.
Cover (a pot lid fits on my kitchenaid stand bowl just fine) and place in the freezer for an hour- or until firm.
Cover a cookie sheet with tin foil. Spray hands with PAM and shape the dough into sixteen 1 inch balls and place on cookie sheet.
Preheat oven to 350 degrees and bake for 12 minutes- or until done.
Let cool, dunk in milk.
Update: These may be the best cookies that I have ever had. Not only do they taste great without butter, but there is really no need for sugar on these bad boys at all. I think that the small amount of sugar that I did sprinkle on top added some texture, but that is it. I am having a hard time now scarfing all of them down at once, and I almost started crying when I tucked some into Alex's school bag (because I'm a greedy little gremlin.)
Sunday, November 21, 2010
Noodle Soup
When I was in China I ate noodle soup probably 3-4 times a week. It took me a while to get used to eating it for breakfast, but it was usually my only breakfast option while we were in Beijing. During that time all I could think about was how much I missed eating cereal and crumpets, but now I look back on my noodle soup and dumpling breakfasts with fond memories. Anyway, since coming back to the states I have been eating a lot of pho, since there aren't any great Chinese places around. I decided to make my own, and I started with beef. I'm going to try making a chicken version in the future, since I know that my sister will actually eat chicken pho. I found an inauthentic recipe (I didn't want to buy oxtail or any other exotic ingredients) online at Life's Ambrosia
Considering the simplicity of the ingredients (which essentially made seasoned beef broth with noodles) , it was pretty darn good.
Ingredients
Put garlic, unsliced onion half, cloves, cinnamon stick and beef broth in a pan and bring to a boil. Cover and lower to a simmer, and let it cook for an hour. This is probably one of the best aromas that I have ever smelled. With about ten minutes left on the timer, start cooking the rice noodles according to the package instructions. Drain the noodles and combine with the broth. Allow the noodles to truly become married with the flavor of the broth, which will take about 5-10 minutes, otherwise the noodles will taste a bit bland. Season with salt and pepper to taste, and top with sliced cooked beef, sliced onion, cilantro, bean sprouts, jalapeno, and sriracha and hoisin sauce. This recipe makes enough for about 2 people.

Considering the simplicity of the ingredients (which essentially made seasoned beef broth with noodles) , it was pretty darn good.
Ingredients
- 4 cups beef broth (this is the average size carton of broth)
- 1 medium yellow onion, cut in half, one half thinly sliced, leave the other half whole
- 2 cloves garlic
- 1 teaspoon whole cloves (making this meal made me realize that I have doubles of A LOT of spices, cloves included)
- 1 cinnamon stick
- 1 teaspoon olive oil
- 1 pound round steak, thinly sliced
- fresh cracked pepper and kosher salt
- 1 (8.8) ounce package of thin rice noodles
- bean sprouts
- 1 – 2 jalapenos, sliced (I forgot to add this, and it probably would have had that extra kick that I noticed was missing)
- cilantro, chopped
- sriracha and hoisin sauce (optional)
Put garlic, unsliced onion half, cloves, cinnamon stick and beef broth in a pan and bring to a boil. Cover and lower to a simmer, and let it cook for an hour. This is probably one of the best aromas that I have ever smelled. With about ten minutes left on the timer, start cooking the rice noodles according to the package instructions. Drain the noodles and combine with the broth. Allow the noodles to truly become married with the flavor of the broth, which will take about 5-10 minutes, otherwise the noodles will taste a bit bland. Season with salt and pepper to taste, and top with sliced cooked beef, sliced onion, cilantro, bean sprouts, jalapeno, and sriracha and hoisin sauce. This recipe makes enough for about 2 people.

Saturday, November 20, 2010
Spicy Roast Beef
I don't like to remake entree recipes often, unless they are really really basic (think tex-mex or stir fry). I think that if I make them too often (~4 times a year), then I will tire of them. I have a history of endlessly eating and tiring of food... Smacks cereal, macaroni and cheese, and other foods that I've repressed in order to prevent myself from crying every time I walk past them in the store. So far I've only been able to regain my will to eat the blueberry cranberry bread from the Breadsmith, a loaf of which I can devour in a sitting. Good thing I'm never actually in town on the days that it is made, otherwise I would probably have sausage fingers from all of the carbs. Anyway, moving away from bread... Today I made a roast, the same roast that I made about a month ago! Alex and I were debating whether or not to go to Outback (which I think we went to like four times in the last two months... yikes!) I won out, and got to make a roast. The crushed pepper really added an nontraditional kick to this roast. It didn't help that I apparently didn't mix the spices well enough, so occasionally there would be bite of very ferocious tasting beef. We had our friend Sarah come over for dinner, even though the poor girl wasn't fed for like two hours because we didn't get back from the grocery store until much later than anticipated. Alex really liked the roast, I really liked the roast, and Sarah will be coming back for dinner again.
This recipe is very SLIGHTLY modified from Food People Want
Ingredients
Rub salt all over the roast the day before (or in my case- two hours before) you plan on baking it for dinner. Cover and wrap tightly in saran wrap, and place in the fridge.
Prior to baking the roast, preheat the oven to 250 degrees.
Rub olive oil over roast and then mix up the spices with the garlic and repeat the rubdown.
In an olive-oiled pan large enough to hold the roast, brown every side (for about two minutes).
Place the roast on a rack that is on top of a cookie sheet. Line the sheet with tin foil to avoid any unnecessary dish washing *shudder*.
Bake in the oven for an hour and twenty minutes at 250. Turn the stove off and leave the roast in for another 25-30 minutes (or until the roast reaches 130-140 degrees).
Slice, consume.

This recipe is very SLIGHTLY modified from Food People Want
Ingredients
- 1.5 lb boneless eye-round roast
- 1 teaspoon freshly ground black pepper
- 2 teaspoons dried oregano
- 2 teaspoons dried basil
- 1/2 teaspoons ground red pepper
- 3 cloves of garlic, finely chopped to a paste. Or 1 tsp garlic paste.
- Salt
- Olive oil
Rub salt all over the roast the day before (or in my case- two hours before) you plan on baking it for dinner. Cover and wrap tightly in saran wrap, and place in the fridge.
Prior to baking the roast, preheat the oven to 250 degrees.
Rub olive oil over roast and then mix up the spices with the garlic and repeat the rubdown.
In an olive-oiled pan large enough to hold the roast, brown every side (for about two minutes).
Place the roast on a rack that is on top of a cookie sheet. Line the sheet with tin foil to avoid any unnecessary dish washing *shudder*.
Bake in the oven for an hour and twenty minutes at 250. Turn the stove off and leave the roast in for another 25-30 minutes (or until the roast reaches 130-140 degrees).
Slice, consume.

Subscribe to:
Posts (Atom)